If you’ve ever set up a SharePoint Farm, you’ll know that one of the first things that you need to configure is Outgoing Email. The way that you typically do this is to specify the name of an Exchange (or any other SMTP server) in your organization, a from and reply to address, and you’re done. Occasionally there are problems because the Exchange (or other) server does not allow relaying, and that’s easily remedied with a quick server configuration.
If you’re using BPOS, you not only have Exchange online, but you have SharePoint online. Outgoing email is already automatically set up for you. Just set an email alert for yourself and your will receive an email when anything changes. However, what about organizations that have elected to use hosted Exchange or BPOS, but also still maintain an on-premises SharePoint farm?
The good news is that it can be done. The bad news is that it’s not as simple as before when everything was on premises. This article will attempt to walk through the required steps.
This example uses SharePoint 2010 but the same is true (I think) for SharePoint 2007.
1. Setup SharePoint Outgoing Mail
As before, go to Central Administration, navigate to system settings, and click the “Outgoing E-Mail Settings” link.

There are two major things to note here. Firstly,the Outbound SMTP server is NOT one of the Online Services servers. What is it? Well,it doesn’t exist yet – we’ll get to that in step 3. The reason for this is that to deliver mail to any of the Online Services servers, you need to authenticate, use SSL, and use a non standard SMTP port. Unless I’m missing something, I don’t see any of those options here. (You can find complete instructions on relaying messages to BPOS and Exchange Online here). What we therefore need to do is to set up our very own SMTP server that can relay these messages for us.
The other thing to take note of here is the “From address”. When working internally, this doesn’t normally matter, you can give it any old fake name and off it goes. This is not true here, if this email address is not valid online, mail will not be delivered. We will add this address later.
2. Update DNS
If you haven’t already done so, you’ll need to add DNS entries for the SMTP server that will use the same IP address as this SharePoint server. In this example I’m using an internal domain, but you’ll also want to add another one externally if you’ll be configuring incoming email. all that will matter is that it resolve to the same machine.
3. Add the SMTP Service
Complete instructions on how to do this (as well as configuring mail for SharePoint generally) here. I will therefore not go into any detail except to point out that if you’re running on Windows versions prior to 2008, the installation procedure is slightly different. The end result is pretty well the same. In fact, I don’t think that this feature has been updated in about 10 years, it still requires the IIS6 admin interface.
4. Add Proxy User to Online Services
Unless you want all of your automated emails appearing as if they originated with an actual user, you’ll want to use a proxy user. The down side is – you’re going to pay a license for this user. Of course, given the cost of hosted Exchange, that’s not a big deal, but it would be nice if this wasn’t required.
If you’re reading this because you have BPOS or Hosted Exchange, you already know how to do this, so I won’t spell it out here. Just remember that this user needs to be the same as that specified in the first step.
5. Configure the SMTP Service
Open up the “Internet Information Services (IIS) 6.0 Manager” from the administrative tools group on the server. You should see your server as a node – open the node, and you’ll see the SMTP server. If it’s not already started, start it. Then right click on the server and select properties. When the properties box comes up, select the delivery tab. It should appear like the following:

If you haven’t already guessed it, we will be using all 3 numbered buttons.
1 – Outbound Security:

This is where we enter the credentials for the proxy user. Exchange Online checks to see if the “From” user and the authenticated user are one and the same. If they’re not, it rejects the message, which is why we need to have the proxy user, and to be careful about the “From” field in step 1.
TLS encryption is basically SMTP’s way of saying SSL, so this screen covers that off as well.
2 – Outbound Connections

This is the screen where we get to specify the non standard SMTP port used by Exchange Online. Use 587.
3 – Advanced

I have no idea why this is any more advanced than either of the other two screens, but no matter. This is where you enter the Online Services SMTP server as a Smart Host. You can also enter a masquerade domain (the “real” mail domain), but it’s optional.
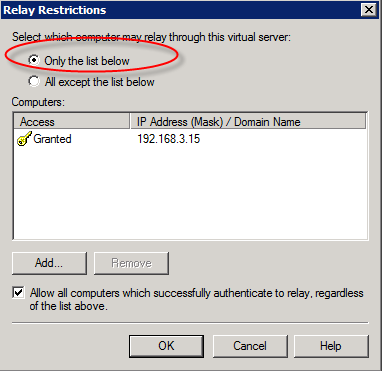
When you’re done, click OK. Then, click the access tab. Click the Authentication button to ensure that Anonymous access is selected (it is by default). Then, click the relay button.
[…] few weeks ago I posted an article on how to get on premises SharePoint working with BPOS for mail delivery (alerts, etc.). […]
There is an easy way:
Ad the External IP adres of your SharePoint server in the Save Sender list in BPOS.
In SharePoint configure SMTP server:mail.global.frontbridge.com
Hello,
Thank you for sharing your views on this. I have duplicated the setting for our test server as per your guidelines. But we are still facing difficulty in configuring outgoing email. We have a question about your second point that you make regarding Updating DNS. So do we need to give the SMTP server its own DNS name? Currently we have used SharePoint Server DNS name.
Your help is this matter will be highly appreciated.
Thanks.
Hi MSS
It doesn””t need to be a different name, but it does need to be available via DNS. What problems are you having?
Hi John,
Well, that is a pretty difficult question 🙂 My answer is that email just doesnt go through. I have set numerous alerts on lists and libraries, but it wont sent me an alert email. Additionally, we have also tried SMTP Telnet client to test if the server is responding. Is there any other way we can test to determine where we are going wrong? Because, as I said the settings within IIS and Central Administration are as per your article.
If you turn logging on for the SMTP server, you should be able to see exactly what it is doing. Have you tried this?
Great write-up. On a local dev server, I just used the HOSTS file to direct DNS. All in all, everything worked perfectly, thanks!
[…] http://whitepages.sfintelligence.com/index.php/2010/09/integrating-sharepoint-on-premises-with-bpos-… […]
The problem I get is in step 3. The error is “the domain name is not valid” and then it highlights the entry in the Smart host. I can ping it, so that makes no sense. Also the fully qualified domain name in the previous field checks out as well.
Any thoughts?
Thanks for this post. It really helped a lot.
[…] http://whitepages.azurewebsites.net/index.php/2010/09/integrating-sharepoint-on-premises-with-bpos-an… […]
[…] http://whitepages.azurewebsites.net/index.php/2010/09/integrating-sharepoint-on-premises-with-bpos-an… […]
Hi,
Link not available;
http://whitepages.sfintelligence.com/index.php/2010/10/integrating-sharepoint-on-premises-with-bpos-and-exchange-online-part-2-inbound/
Thanks